
Connecting your iPhone to your Mac is an essential process for any Apple user. This comprehensive guide will walk you through the various methods to connect your iPhone and Mac, facilitating seamless data transfer and syncing. Whether you need to transfer photos, videos, music, or other files, or if you want to keep your contacts, calendars, and apps updated across both devices, understanding the connection process is crucial. We will cover using a USB cable, a Wi-Fi connection, and leveraging the power of iCloud for a truly integrated experience.
Learn how to establish a strong and reliable connection between your iPhone and Mac, enabling you to effortlessly manage and synchronize your valuable data. This guide delves into the nuances of each connection method, highlighting the advantages and disadvantages, ensuring you can choose the best approach for your specific needs. From simple file transfers to comprehensive device backups and software updates, we’ll equip you with the knowledge to navigate the connection process confidently and efficiently. Master the art of iPhone to Mac connectivity and unlock the full potential of your Apple ecosystem.
Different Methods for Connecting iPhone to Mac (Cable, Wi-Fi, Bluetooth)
There are several ways to connect your iPhone to your Mac, each offering different benefits depending on your needs. Choosing the right connection type can streamline your workflow and ensure a smooth transfer of data.
Wired Connection (USB): The most common and generally fastest method involves using a USB cable. Connect the Lightning end to your iPhone and the USB end to your Mac. This method is ideal for transferring large files quickly and is necessary for certain tasks like restoring your iPhone.
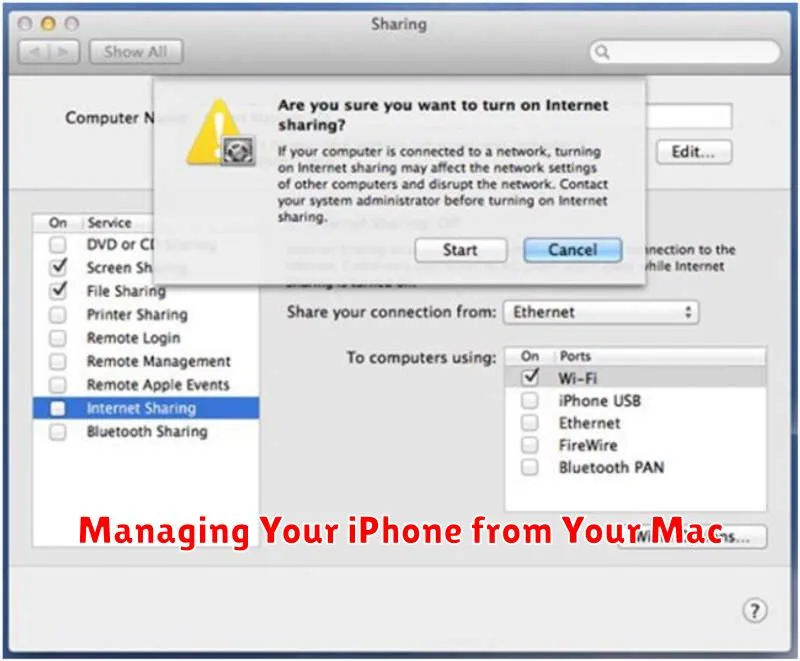
Wireless Connection (Wi-Fi): For a cable-free experience, you can connect your iPhone and Mac over your Wi-Fi network. This allows for wireless syncing and backups and is convenient for everyday use. Ensure both devices are connected to the same network and have Wi-Fi syncing enabled.
Bluetooth Connection: Bluetooth offers another wireless option, particularly useful for sharing files via AirDrop or connecting to certain peripherals. While convenient for smaller file transfers and short-range connections, it’s significantly slower than wired or Wi-Fi connections.
Setting Up and Troubleshooting USB Connections
Connecting your iPhone to your Mac via USB is generally straightforward. First, ensure you have the correct cable, typically a USB to Lightning cable. Plug one end into your iPhone’s charging port and the other into a USB port on your Mac.
Upon connection, your iPhone should prompt you to “Trust This Computer.” Tap “Trust” if you intend to regularly connect to this Mac. This step is crucial for data access.
Troubleshooting
If your Mac doesn’t recognize your iPhone, try these steps:
- Check the cable: Ensure the cable isn’t damaged and is Apple certified. Try a different cable if possible.
- Restart devices: Restart both your iPhone and your Mac. This can resolve temporary software glitches.
- Update software: Make sure your Mac’s operating system and your iPhone’s iOS are up-to-date.
- Try different ports: Try plugging the USB cable into a different port on your Mac.
Transferring Files Using Finder or iTunes
Both Finder (in macOS Catalina and later) and iTunes (in earlier macOS versions) provide ways to transfer files between your iPhone and Mac. Choosing the right method depends on your macOS version and the types of files you’re transferring.
Using Finder: Connect your iPhone to your Mac with a USB cable. Your iPhone should appear in the Finder sidebar under Locations. Selecting your device allows you to manage various types of content, including music, movies, TV shows, podcasts, audiobooks, books, photos, and files.
Using iTunes: For older macOS versions, connect your iPhone and open iTunes. Your iPhone icon will appear near the top left of the iTunes window. Click the icon to manage syncing and manual file transfers, similar to Finder. Remember to authorize your computer in iTunes if needed.
Whether using Finder or iTunes, you can drag and drop files for quick transfers or utilize the dedicated syncing features for specific content types like music or photos. Be mindful of file compatibility between your iPhone and Mac.
Syncing Data with iCloud
iCloud offers a seamless way to keep your iPhone and Mac in sync without requiring a direct connection. By enabling iCloud syncing for specific data categories, changes made on one device automatically update on the other. This applies to various data types, including photos, contacts, calendars, notes, reminders, and more.
To enable iCloud syncing on your iPhone, go to Settings > [Your Name] > iCloud. Toggle on the categories you wish to synchronize. Ensure you’re signed in with the same Apple ID on both your iPhone and Mac. On your Mac, access iCloud settings through System Preferences > Apple ID > iCloud. Similar to your iPhone, select the data categories you want to keep synchronized.
Key benefits of using iCloud sync include automatic backups, access to your data across multiple devices, and the ability to restore your data to a new device easily. iCloud ensures your information is consistently updated and available wherever you need it.
Using AirDrop for Quick File Sharing
AirDrop offers a fast and convenient way to share files wirelessly between your iPhone and Mac. It leverages Bluetooth technology for discovery and Wi-Fi for the actual transfer, providing a secure and efficient connection.
To use AirDrop, ensure both Wi-Fi and Bluetooth are enabled on both devices. On your iPhone, you can access AirDrop settings through the Control Center. On your Mac, open Finder and select AirDrop from the sidebar. Your Mac will automatically detect nearby Apple devices eligible for AirDrop.
When sharing a file from your iPhone, select the “Share” icon and choose your Mac from the list of available AirDrop destinations. Conversely, from your Mac, simply drag and drop the file onto the icon representing your iPhone in the AirDrop window.
You can adjust your AirDrop receiving settings to control who can see your device and send you files. Options typically include “Contacts Only” or “Everyone.”
Managing Your iPhone from Your Mac
Your Mac offers a range of tools to manage your iPhone efficiently. Beyond simple file transfer, you can perform tasks directly on your device from your computer. This streamlines your workflow and keeps your iPhone organized.
Finder allows you to back up your iPhone, update its software, and even restore it to factory settings if needed. You can browse your device’s storage and manage apps, music, and other data directly through the Finder window.
For specific content management, utilize dedicated applications on your Mac. Photos syncs and manages your photo library, while Music handles your music collection. These apps offer a larger screen and more intuitive interface for organizing and enjoying your content.
Furthermore, certain tasks can be automated. For example, you can schedule automatic backups to ensure your data is regularly saved. This provides an extra layer of security and protects you from data loss.
Troubleshooting Common Connection Issues
Occasionally, you might encounter problems connecting your iPhone to your Mac. This section provides troubleshooting steps for common issues.
Basic Troubleshooting
Start with these fundamental checks:
- Restart your devices: A simple restart can often resolve minor software glitches affecting the connection.
- Check cables and ports: Ensure your USB cable is undamaged and correctly plugged into both devices. Try a different cable or port if possible.
- Update software: Make sure both your Mac and iPhone are running the latest versions of macOS and iOS. Software updates often contain bug fixes that can improve connectivity.
Advanced Troubleshooting
If the basic steps don’t resolve the issue, consider these:
- Trust This Computer: When connecting via USB, ensure you’ve tapped “Trust” on your iPhone when prompted. This authorizes the connection.
- Check Security & Privacy settings (Mac): On your Mac, navigate to System Preferences > Security & Privacy. Verify that your iPhone is allowed in the Privacy tab (e.g., for Files and Folders access).