
Is your device acting up? Are you experiencing persistent software issues or boot loops? Accessing Recovery Mode might be the solution. This comprehensive guide provides a step-by-step approach on how to reboot various devices into Recovery Mode. Understanding how to access Recovery Mode is crucial for troubleshooting, performing factory resets, applying software updates, and more. Whether you’re dealing with a malfunctioning smartphone, tablet, or computer, this guide will equip you with the knowledge to access the essential Recovery Mode tools for your specific device.
Recovery Mode is a powerful diagnostic and repair environment that can help you resolve a range of software-related problems. This guide will cover various methods for accessing Recovery Mode on different devices, including Android smartphones and tablets, iPhones and iPads, Windows PCs, and Macs. Learn how to use the correct button combinations or commands to reboot your device into Recovery Mode. Mastering this essential skill will empower you to address software issues, restore your device to its factory settings, and ultimately regain control of your technology.
Understanding Recovery Mode and Its Uses
Recovery Mode is a special bootable partition on your device that contains tools for troubleshooting and repairing software issues. It exists independent of the main operating system, allowing you to access it even if your device is experiencing problems that prevent normal booting.
This mode provides several essential functions. Primarily, it allows you to perform factory resets, which can resolve persistent software glitches or prepare your device for sale. Recovery Mode can also be used to apply software updates manually, clear the cache partition to fix performance hiccups, and even recover your device from a boot loop.
Understanding when to utilize Recovery Mode is crucial. It’s typically employed when your device is unresponsive, frozen, or trapped in a boot loop. If standard troubleshooting steps fail, Recovery Mode can be a valuable resource for restoring your device’s functionality.
Preparing Your Device for Recovery Mode
Before entering recovery mode, it’s crucial to take a few precautionary steps to ensure a smooth process and prevent potential data loss. The most important step is to back up your data. Recovery mode operations can sometimes lead to data erasure, so creating a backup beforehand safeguards your valuable information.
Ensure your device has sufficient battery charge. Ideally, your device should be fully charged, but at least 50% battery is recommended to prevent interruption during the process. A power outage mid-process could cause further issues.
Familiarize yourself with the button combinations specific to your device model. These combinations vary between manufacturers and even between different models from the same manufacturer. Refer to your device’s documentation or the manufacturer’s website for the correct instructions.
Finally, find a quiet and undisturbed workspace. The process of entering recovery mode often requires precise timing and button presses. A distraction-free environment will help you focus and avoid errors.
Steps to Reboot into Recovery Mode on Android Devices
Accessing Recovery Mode on Android devices can vary slightly depending on the manufacturer and model. However, the general process involves a combination of button presses while powering on the device. Powering off your device is the crucial first step.
The most common method involves pressing and holding a combination of buttons. Typically, this includes the Power button and the Volume Down button. Some devices might require the Volume Up button instead, or even a combination of all three buttons. Consult your device’s specific instructions for the precise combination.
Once the device begins to power on, you may see the manufacturer’s logo. Continue holding the buttons. The Android Recovery screen, typically displaying a small Android robot icon, should appear after a short time. If the device boots normally, you may need to try the process again, ensuring you are holding the correct button combination.
From this screen, you can navigate the recovery options using the volume buttons and select options using the power button. Be cautious when navigating these options as improper use could lead to data loss.
Steps to Reboot into Recovery Mode on iOS Devices
Rebooting an iOS device into recovery mode requires specific button combinations depending on the device model. It’s crucial to follow the correct steps for your particular device to avoid any complications.
iPhones with Face ID (iPhone X and later)
- Quickly press and release the Volume Up button.
- Quickly press and release the Volume Down button.
- Press and hold the Side button. Keep holding it even after the Apple logo appears, until you see the recovery mode screen.
iPhones with Home Button (iPhone 8 and earlier), iPad, and iPod touch
- Connect your device to your computer using a USB cable.
- For iPhones with Home Button: Press and hold the Home button. For iPads and iPod touch without Home Button: Press and hold the Top button.
- While still holding the button, continue connecting to your computer. Keep holding it even after the Apple logo appears, until you see the recovery mode screen.
Once in recovery mode, you’ll see the connect-to-computer screen. You can then use your computer and a program like Finder (macOS Catalina and later) or iTunes (earlier macOS versions and Windows) to restore or update your device.
Common Issues and Troubleshooting
While entering recovery mode is usually straightforward, some users might encounter issues. This section addresses common problems and provides troubleshooting steps.
Device Not Entering Recovery Mode
If your device doesn’t enter recovery mode after following the steps, double-check the button combination specific to your device model. Timing is crucial; you might need to hold the buttons for a specific duration or release them in a particular sequence. Consult your device’s official documentation for precise instructions.
Frozen Recovery Screen
A frozen recovery screen can be alarming. First, try force-restarting your device. If this doesn’t resolve the issue, it might indicate a more serious software problem. Consider seeking professional assistance or contacting your device manufacturer’s support.
Recovery Mode Loop
If your device repeatedly boots into recovery mode without user intervention, it could signify a corrupted operating system or other software issues. Restoring your device to factory settings from within recovery mode is often the best course of action. Remember, this will erase all data on your device.
Navigating the Recovery Mode Menu
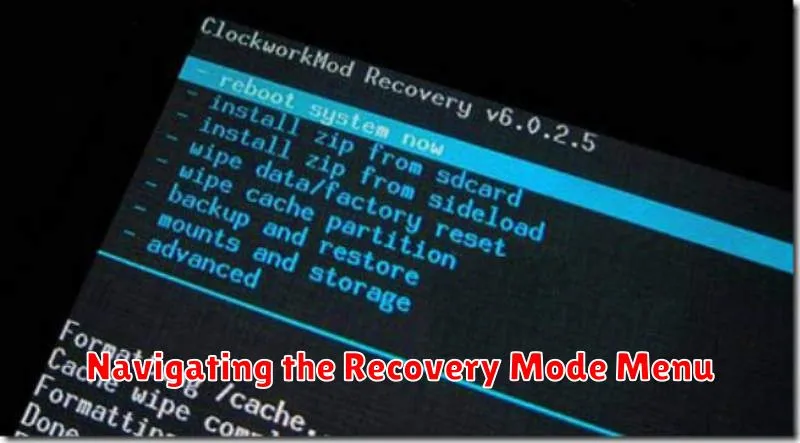
Once you’ve successfully entered recovery mode, you’ll be presented with a menu. Navigation typically involves using the volume buttons to move up and down between options and the power button to select an option. However, this can vary slightly depending on the device manufacturer.
The recovery menu generally consists of text-based options displayed on a black background. These options allow you to perform various actions, such as applying updates, wiping data, and rebooting the system.
It’s crucial to navigate carefully within the recovery menu, as some actions, like a factory reset, are irreversible. Ensure you understand the function of each option before selecting it. If you are unsure, it’s always best to exit recovery mode and seek further guidance.
Some devices may utilize a touchscreen interface, especially newer models. In such cases, navigation is straightforward, involving tapping the desired options on the screen.
Utilizing Recovery Mode Options
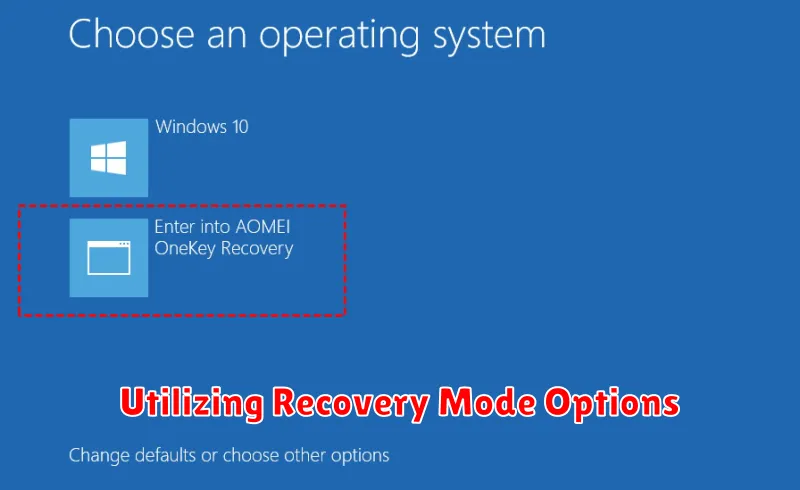
Once in recovery mode, you’ll encounter a menu with several options. Navigating this menu typically involves using the volume buttons to move up and down and the power button to select. The available options vary depending on the device and its operating system.
Common recovery options include:
- Reboot system now: Exits recovery mode and restarts the device normally.
- Apply update from ADB: Allows installation of updates from a computer using the Android Debug Bridge (ADB) tool.
- Apply update from SD card: Installs updates from a storage card.
- Wipe data/factory reset: Erases all user data and restores the device to its factory settings. Use this option with caution as it results in complete data loss.
- Wipe cache partition: Clears the system cache, which can resolve performance issues.
- Mount /system: Mounts the system partition, making it accessible for modifications.
Understanding these options is crucial for effectively troubleshooting and maintaining your device. Always choose carefully and confirm your selection before proceeding, as some actions are irreversible.
Restoring Your Device to Factory Settings
Restoring your device to its factory settings, also known as a factory reset or hard reset, erases all user data and returns the device to its original state as it was when you first purchased it. This process is often used to troubleshoot persistent software issues or to prepare a device for sale or transfer.
Caution: A factory reset will permanently delete all data stored on your device, including photos, videos, music, apps, and personal settings. It is imperative to back up any important data before proceeding.
Steps to Perform a Factory Reset in Recovery Mode:
- Access Recovery Mode using the steps outlined previously for your specific device (Android or iOS).
- Navigate through the Recovery Mode menu using the volume buttons (or touchscreen on some devices) to highlight the option usually labeled “Wipe data/factory reset” or similar.
- Select the option using the power button (or by following the on-screen instructions).
- Confirm the factory reset when prompted. This action is irreversible.
- After the reset process is complete, select “Reboot system now” to restart your device.
The initial setup process will begin after the reboot, just as it did when the device was new.