
Looking to enhance your video conferencing experience? Need a webcam but don’t have one readily available? This comprehensive, step-by-step guide will show you how to transform your Android device into a fully functional webcam for your computer. Whether you’re using Windows, macOS, or Linux, this guide covers the essential steps to seamlessly integrate your Android phone or tablet as a webcam, offering a cost-effective and convenient solution for all your video needs. Learn how to leverage the power of your existing Android device and elevate your video calls, live streams, and online interactions to a new level of quality and convenience.
This tutorial provides a clear and concise method for utilizing your Android device as a webcam. We’ll explore the necessary software and hardware requirements, walk you through the setup process on both your Android phone/tablet and your computer, and offer troubleshooting tips to ensure a smooth and effective transition. Unlock the potential of your Android device and discover a simple yet powerful way to improve your video communication with this easy-to-follow guide. Start using your Android as a webcam today and experience the difference!
Choosing the Right Webcam App
Selecting the right webcam app is crucial for a smooth and high-quality video streaming experience. Several factors should influence your decision, including desired features, ease of use, and compatibility with your operating system.
Consider whether you need basic webcam functionality or require advanced features such as video filters, special effects, or adjustable resolution settings. Some apps prioritize simplicity, offering a streamlined setup process and intuitive interface. Others provide a wider range of customization options, catering to more advanced users.
Compatibility is another key factor. Ensure the app supports both your Android version and your computer’s operating system (Windows, macOS, or Linux). Check user reviews and ratings to gauge the app’s performance and stability. Look for apps with positive feedback regarding video quality, reliability, and low latency.
Installing the App on Your Android and Computer
Once you’ve chosen your preferred webcam app, the next step is installing it on both your Android device and your computer. This process ensures seamless communication between the two devices.
Installing on your Android Device
Locate your chosen app on the Google Play Store. Tap “Install” and allow the necessary permissions. The installation process is typically quick and straightforward. After installation, open the app to ensure it launches correctly.
Installing on your Computer
Most webcam apps require a companion desktop client or software. Navigate to the app developer’s website and download the appropriate client for your operating system (Windows, macOS, or Linux). Run the installer and follow the on-screen instructions. Ensure you accept any necessary driver installations to allow the computer to recognize your Android device as a webcam.
Connecting Your Android Device to Your Computer
After installing the chosen webcam app on both your Android device and computer, the next crucial step is establishing a connection between them. This connection facilitates the transfer of video and audio data from your phone to your computer. There are two primary methods to connect your device: USB and Wi-Fi.
USB Connection
For a USB connection, use a compatible cable to link your Android device directly to your computer. This method generally offers lower latency and is ideal for situations requiring minimal delay. Ensure your Android device has USB debugging enabled. Your computer should automatically detect the connected Android device as a webcam once the app is launched on both devices.
Wi-Fi Connection
Alternatively, connect your Android device and computer to the same Wi-Fi network. Launch the webcam app on both. The app should guide you through the process of establishing a wireless connection. This method offers greater flexibility in positioning your Android device. However, it can be susceptible to network interference, potentially impacting video and audio quality.
Configuring Webcam Settings on Your Computer
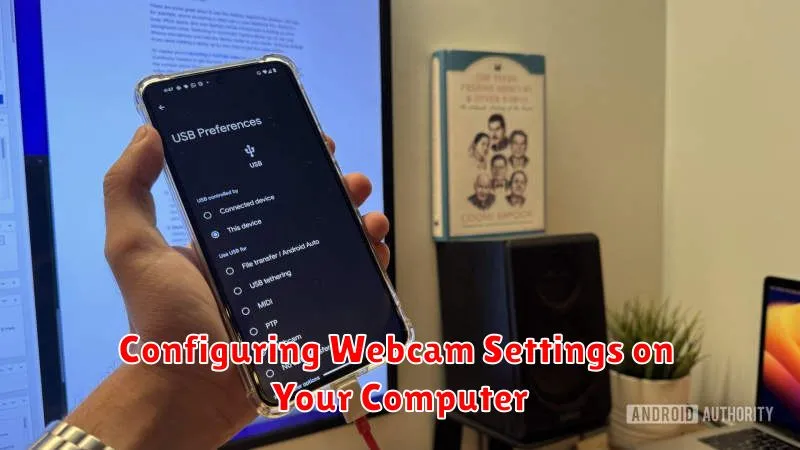
After successfully connecting your Android device, you’ll need to select it as your primary webcam input within your computer’s applications. This process varies slightly depending on the software you’re using.
For video conferencing applications like Zoom, Skype, or Google Meet, navigate to the application’s settings menu. Look for a “Video” or “Camera” section. From the available dropdown menu of camera devices, choose your Android device’s name, which should now be listed as an available webcam option.
Streaming software such as OBS Studio or Streamlabs OBS also require camera selection within their settings. Locate the “Sources” panel and either add a new “Video Capture Device” or modify the settings of an existing one. Select your Android device from the device list in the properties window.
If your Android device isn’t appearing as an option, ensure the connection is secure and the webcam app on your phone is still running. You may also need to restart the application on your computer.
Testing Your Android Webcam
After installing and connecting your Android device, it’s crucial to test its functionality as a webcam. This process ensures everything is working correctly before you rely on it for important calls or recordings.
The most straightforward method involves using a video conferencing application. Launch your preferred app, such as Zoom, Skype, or Google Meet, on your computer. Navigate to the application’s settings and select your Android device as the video source. Look for options like “Camera,” “Video,” or “Video Input.” Your Android device’s camera feed should appear in the preview window.
Pay close attention to the video and audio quality. Check for any lag, distortion, or audio issues. If you encounter problems, refer to the troubleshooting section of this guide. If the video and audio are clear, then congratulations! You’ve successfully transformed your Android device into a functional webcam.
Troubleshooting Common Issues
Encountering problems while using your Android device as a webcam? Here are some common issues and their solutions:
Connection Problems
If your computer isn’t detecting your Android device, ensure both devices are on the same Wi-Fi network. Restarting your phone and computer can also resolve connection glitches. Check the USB cable if using a wired connection. Ensure the correct USB debugging settings are enabled on your Android device.
Video or Audio Lag
Lag can be caused by a weak Wi-Fi signal or high CPU usage on either device. Try closing unnecessary applications. Reducing the video resolution in the webcam app can also help. Ensure your phone is not performing other intensive tasks in the background.
App Crashes
If the webcam app is crashing, ensure it’s the latest version. Try reinstalling the app on both your phone and computer. Check if your phone’s operating system is compatible with the app’s requirements.
No Audio
If you’re not getting any audio, check the audio input settings on your computer. Ensure your Android device is selected as the audio source and that the mute function is off. Restart the app on both devices.
Tips for Optimal Webcam Performance
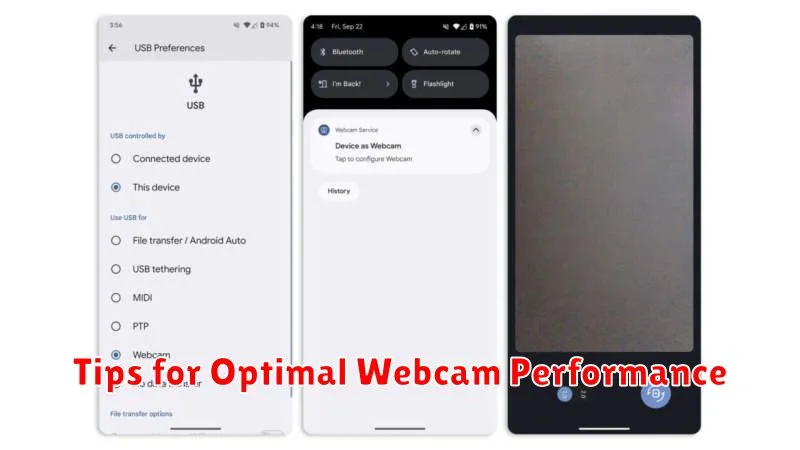
To ensure a smooth and high-quality video streaming experience when using your Android device as a webcam, consider these optimization tips:
Lighting and Positioning
Lighting plays a crucial role in video quality. Ensure adequate lighting in your environment, preferably facing you. Avoid backlighting, as it can make you appear silhouetted. Positioning your Android device correctly is also essential. Place it at eye level or slightly above for a flattering angle.
Network Stability
A stable network connection is vital for uninterrupted video streaming. If possible, use a wired connection for your computer. For your Android device, connect to a strong Wi-Fi signal or consider using a USB connection if your chosen app supports it.
Device Performance
Close unnecessary apps on both your Android device and computer to free up system resources. A fully charged battery on your Android device is recommended to prevent unexpected shutdowns during use. Consider using a phone stand or tripod to keep your device stable and prevent shaky video.